
Ultimate Classic Roast Turkey turns out perfectly juicy every time thanks to a wine-and-butter-soaked cheesecloth that keeps the turkey from drying out for most of the roasting time.

Updated post.
I'm here to walk you through making a perfect turkey. There's also some nostalgia here, but you can feel free to skip all that by clicking the jump to recipe button above, or by navigating through the post with this list of topics:
Jump to:
Turkeys of Thanksgivings past
I remember my mother getting up very early in the morning on Thanksgiving day—still half asleep—to get the turkey in the oven.
This produced all sorts of hilarious results, from discovering that she’d put the bird in the oven upside-down to finding the giblet packet still nestled inside the cavity like a gory Christmas present.
Mom would roast the turkey all day for fear of salmonella contamination—as a result, the bird would often be reminiscent of the turkey scene in National Lampoon’s Christmas Vacation.
Phil has an all-out turkey fetish, so he really, really looks forward to this dinner.
Not just once a year, either: nay, we have half-Thanksgiving, Birthday Thanksgiving, Thanksgiving for Christmas...and I have to admit: turkey is really, really economical—especially given everything you can do with the leftovers.
The first time I made turkey on my own, I:
...investigated the pros and cons of wet brines vs. dry brines, of injecting vs. basting, and whether to stuff or not to stuff.
...watched Alton Brown (he’s a brining, no-basting, non-stuffer).
...watched Food Network’s Thanksgiving Special.
...combed through the Thanksgiving Dinner editions of Fine Cooking and Food and Wine.
The perfect solution: turkey mummy
And then, I found a reportedly fail-safe recipe from Martha Stewart.
The comment section was full of fans raving about how their turkey came out picture-perfect, tender, and delicious every time. I have since made turkey according to this recipe 10 times. I can attest: the result is perfection.
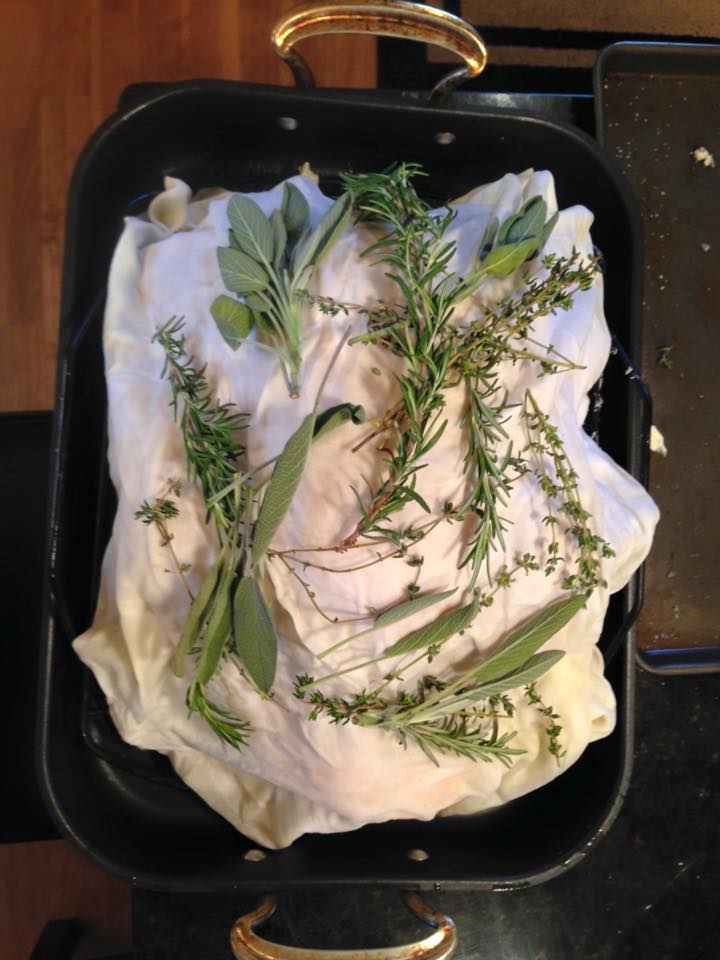
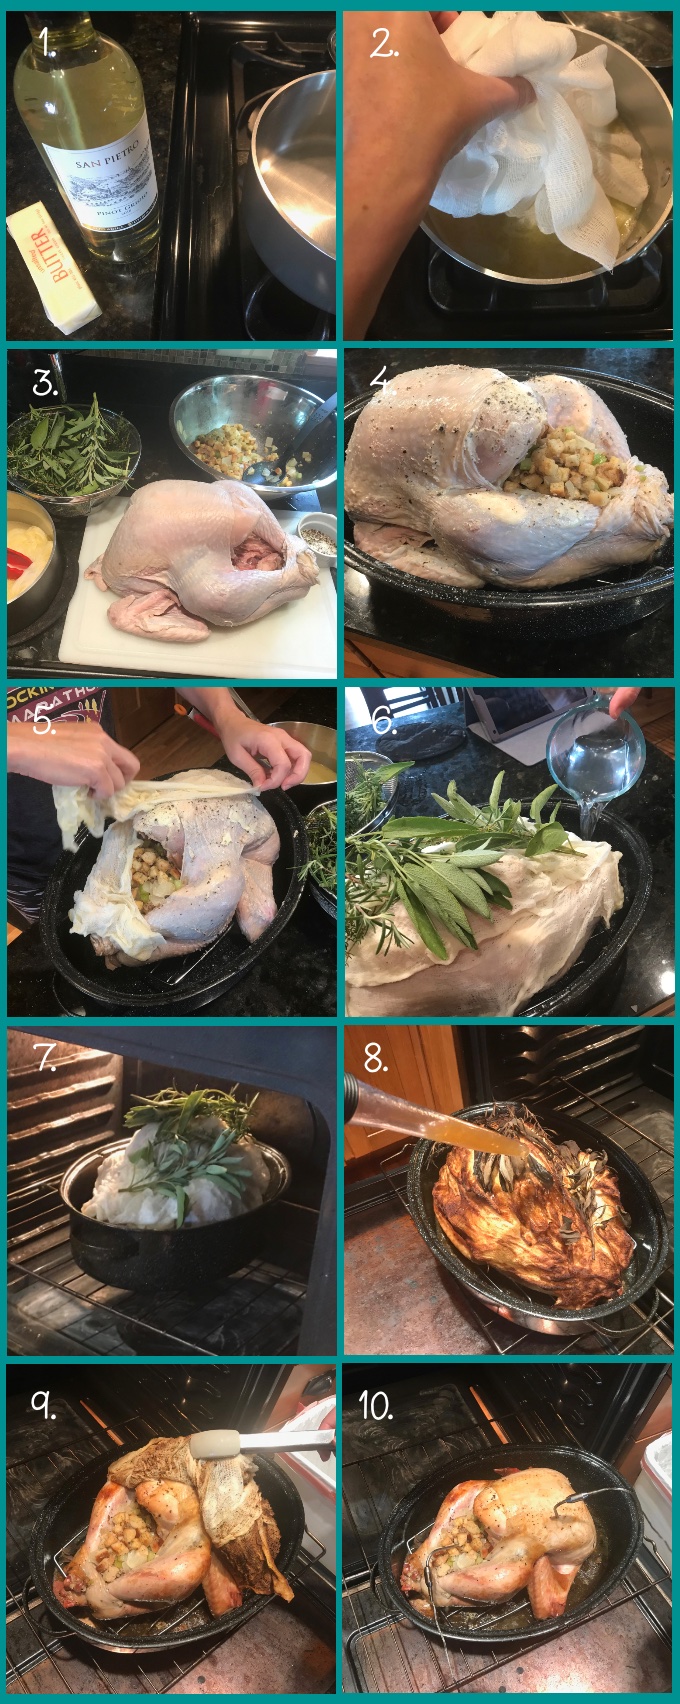
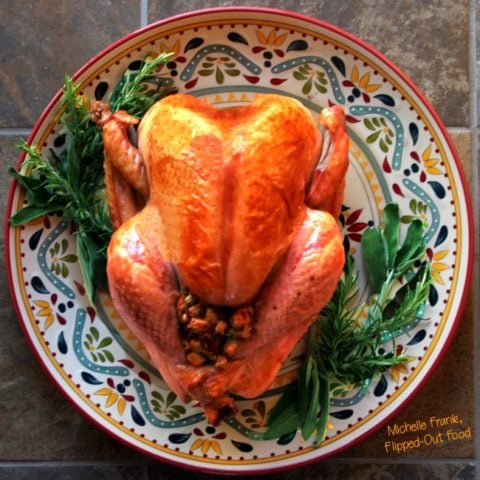
My slightly adapted recipe—which I am now calling the Ultimate Classic Roast Turkey—involves draping the turkey with wine-and-butter-soaked cheesecloth, which prevents the turkey from drying out during the roast.
While the "turkey mummy" cooks, you baste with the wine and butter mixture and pan juices. I like to stick fresh herbs into the cheesecloth and add chicken broth to the roasting pan for some steam from the bottom. Other than that, I've changed very little.
This classic turkey is the closest to a foolproof roast turkey recipe as any recipe I've ever found.
What size turkey should I buy?
The usual recommendation is to plan for 1.5 lbs. of turkey per person. No, not everybody is going to actually eat 1.5 lbs., but that includes the bones.
I'm also calculating so that you'll have leftovers, because let's face it: turkey leftovers are AWESOME.
How long should I thaw turkey?
The general recommendation is to allow 1 day of thaw time in the fridge per 5 pounds of bird, so a 20-lb turkey will take 4 days to thaw.
It's tempting to let the turkey thaw in a cold garage; however, you really can't control the temperature, so this isn't a safe method.
If it's the last minute and you don't have time, you can usually find a never-frozen bird at the grocery—but you'll pay a premium.
What is the best way to clean turkey?
Tons of recipes tell you to rinse the bird.
The standard method for rinsing is to put the bird in the (clean) sink under the faucet.
DON'T DO IT THIS WAY.
Water from a running faucet will hit the bird and atomize into a cloud of nastiness, which will spray all over your kitchen and dramatically increase the chances of making your guests sick.
That would be awful.
If you must rinse the bird, do so by adding cold water to a large container and very gently—no splashes!—pour it over your bird in the (carefully washed out) sink. After you've dried off the turkey and covered it with plastic wrap, use a sanitizer to clean all surfaces near the sink.
How to prep turkey for roasting
- The turkey must sit at room temperature for 2 hours. I usually rinse (yes) as described above, pat dry with plenty of paper toweling, and cover with a few sheets of plastic wrap.
- Make sure to remove the neck and giblet package, if present (check both the abdominal and neck cavities!). Reserve if you like giblet gravy.
- You also need a stick of butter at room temperature (for rubbing down the turkey).
- Make the wine and butter mixture in advance so it can cool somewhat before you add the cheesecloth and wring it out (otherwise, ouch!).
How long to roast turkey?
This varies significantly depending on the size of the bird, the roast itself can take anywhere from 3–5 hours.
The rule-of-thumb is 20 minutes per pound. But there are a few reasons that this doesn't quite work for this recipe: one, we do a 30-minute roast at higher temperature, and two, the bird is stuffed.
I take a "it's done when it's done" approach by using temperature probes in either the breast or thigh and in the center of the stuffing.
The stuffing breast and should reach 165ºF; thighs should reach 180ºF.
Keep in mind, too, that the turkey should sit at room temperature for at least 1 hour (preferably 2) before roasting, and rest at least ½ hour before carving.
That's potentially a total of 4–8 hours (again, depending on the size of your bird), so plan accordingly.
After roasting the turkey at a really high temperature for half an hour, I baste, add chicken stock to the roasting pan, and continue roasting at a lower oven temperature.
I baste every half-hour. The chicken stock steams the turkey from below while adding great flavor to the pan drippings.
Of course, you use those drippings to make easy, rich turkey gravy later.
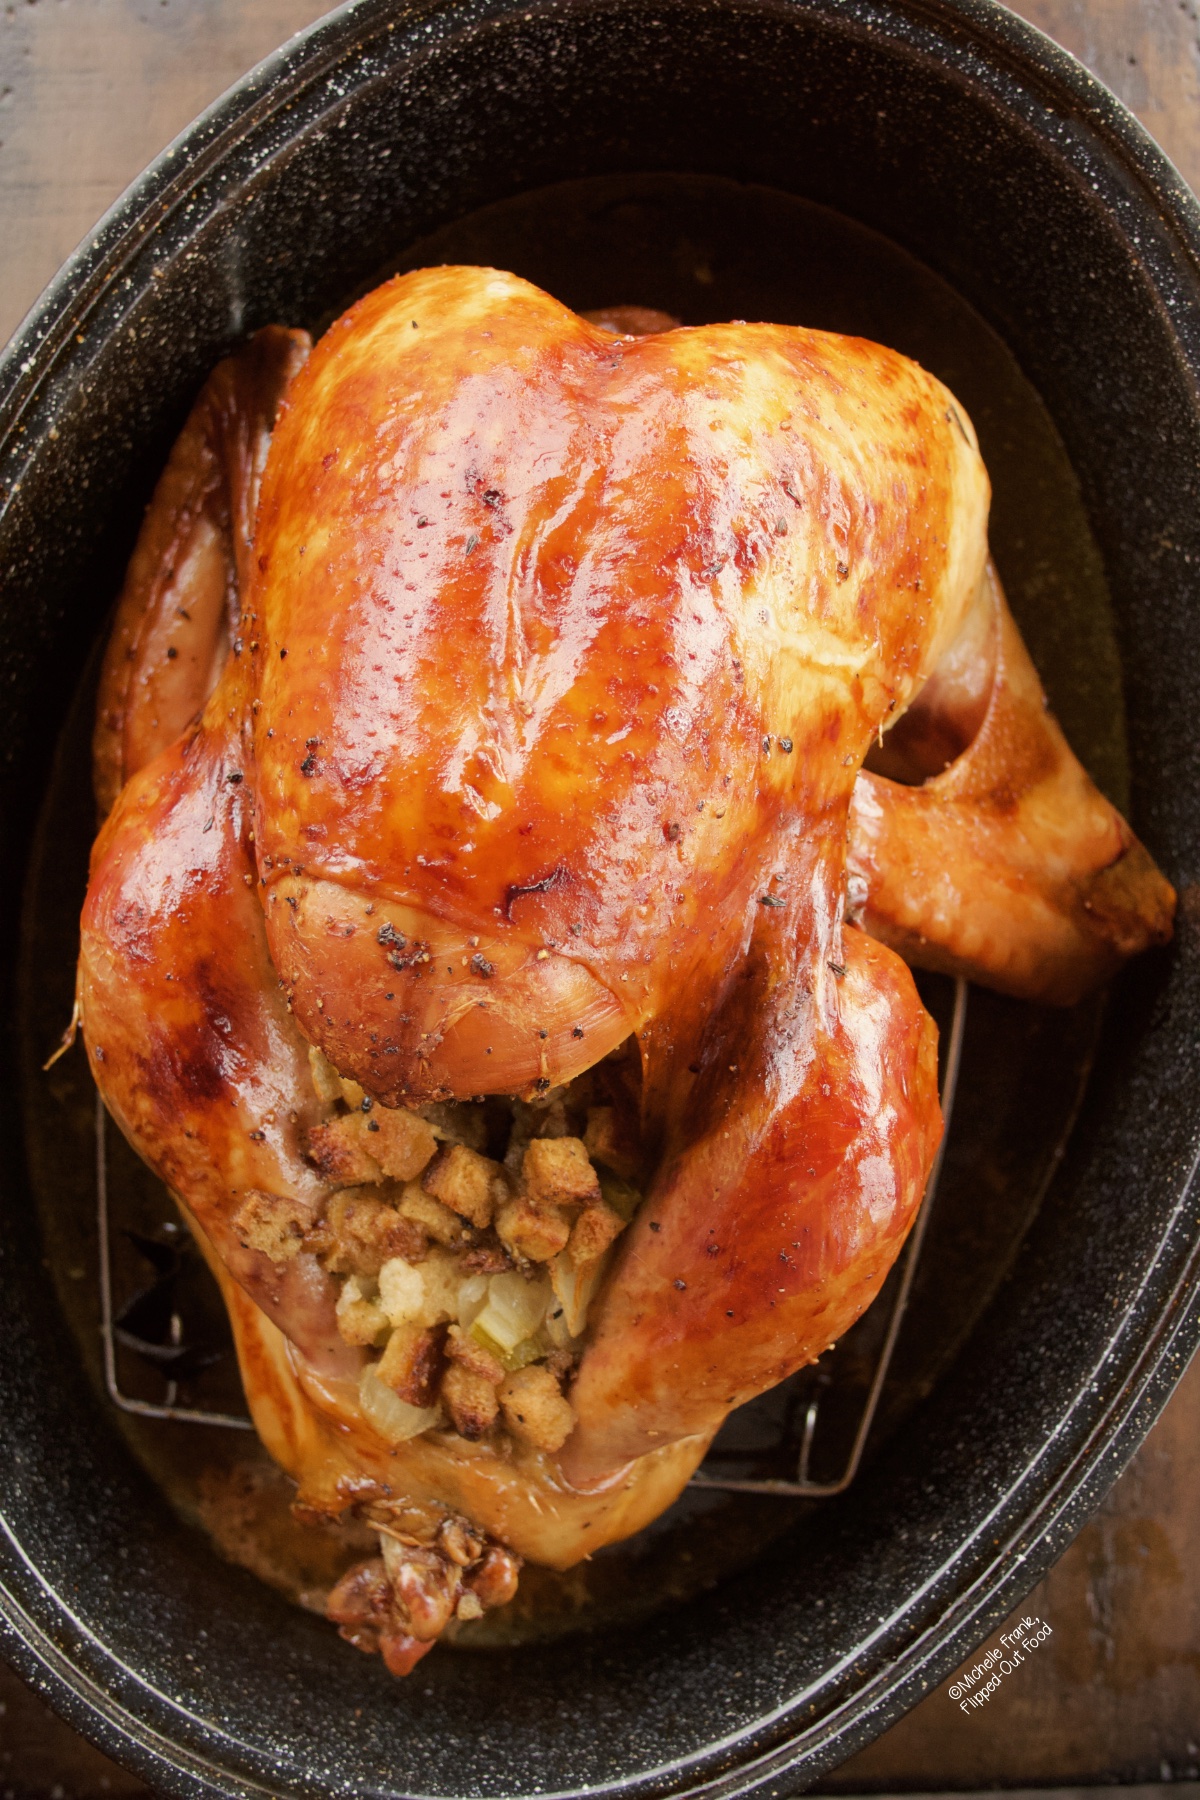
About 3 hours into the roast, I remove the cheesecloth to let the turkey brown up, continuing to baste every 30 minutes.
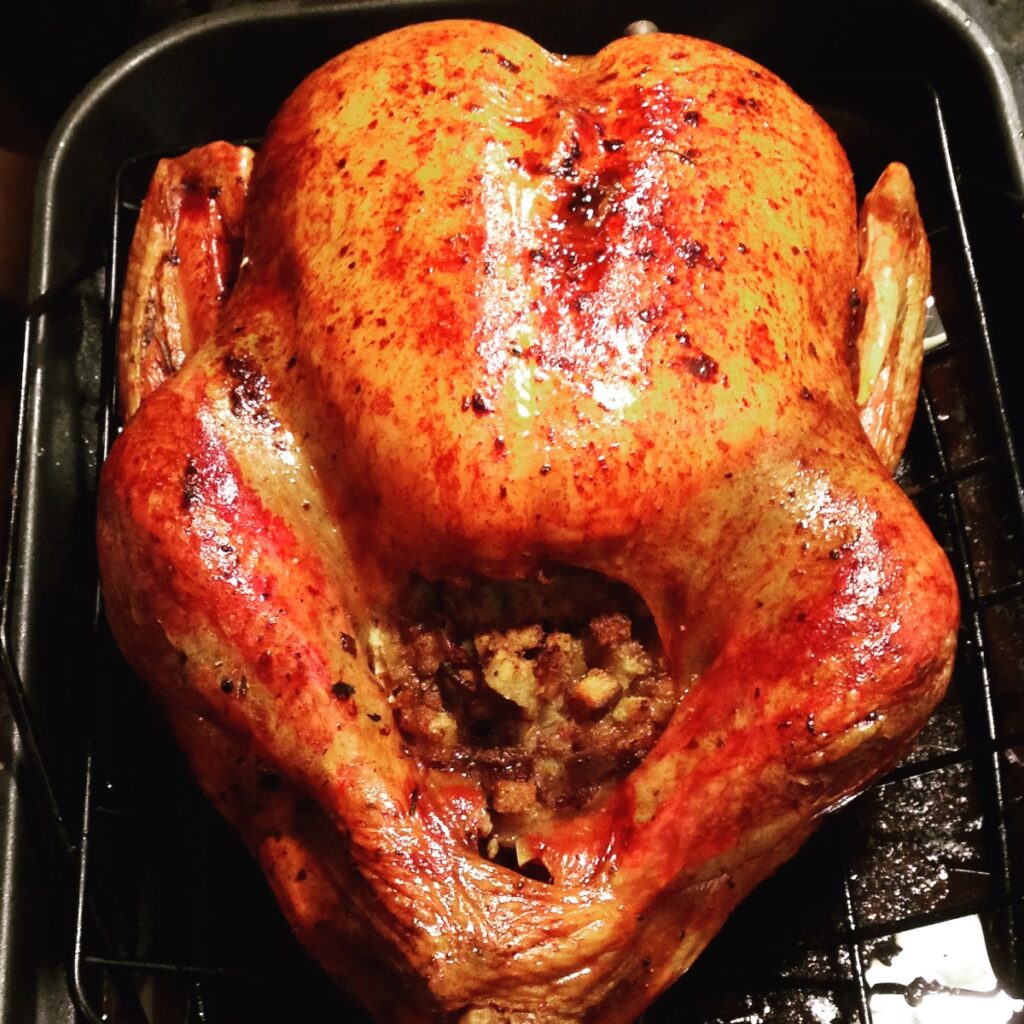
You can see that the bird develops a gorgeous golden color.
I start checking the temperature of the bird at this point: I have a digital thermometer with 2 probes (one in the breast and one in the thigh).
The bird is done when the breast reaches 180º and the thigh reaches 165º.
I also check the stuffing with an instant-read thermometer to make sure that it reaches 165º.
After removing your roast turkey from the oven, rest it for at least 30 minutes.
This is great news if you're making the full turkey dinner!
After all, you'll need to bake your side-dishes and make gravy and mashed potatoes.
The links to all those yummy recipes are below!
How to carve turkey
This is something that still gives me the jitters.
Every time I'm about to go in with my knife, I watch a video reminding me how to do it—but more often than not, I admit that I happily let the hubster take over.
I could try to describe the steps to you, but I think a visual is really needed. So here's the video we watch.
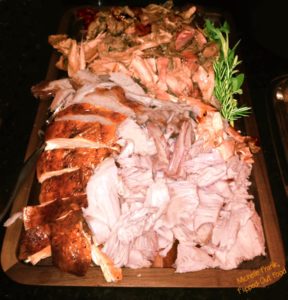
Arrange the various parts of the Ultimate Classic Roast Turkey so that the white meat and the dark meat are separated.
It's a great idea to leave the drumsticks intact, because there's always somebody who will enjoy a drumstick.
I won't lie: making the Ultimate Classic Roast Turkey is a production, but it's SO worth it.
You'll get tons of stock out of the carcass and have lots of meat left over to use in a variety of dishes.

Classic Roast Turkey Side Dishes
Of course, you can't eat your turkey by itself. Here are some great ideas, whether you're planning a traditional turkey dinner spread or just a couple of sides.
- Make-Ahead Green Bean Casserole
- Easy Sausage Stuffing
- Perfect Meal-Prep Creamy Mashed Potatoes, or for a more rustic texture,
- Easy Skin-On Mashed Potatoes with Horseradish (leave out the horseradish if you're serving with gravy!)
- Easy, Rich Turkey Gravy
- Green Beans with Bacon and Onions
- Easy Microwave Brussels Sprouts – since these easy sprouts cook in the microwave, you're not taking up valuable real estate on the stove top or in the oven!
- Arugula-Shaved-Fennel Salad
And if you are planning a turkey dinner with all the bells and whistles, don't forget my Work-Ahead Thanksgiving Dinner Meal Plan. Complete with free printable game plan and shopping list!
Help: I need turkey leftover recipes!
Don't worry: I've got you covered. One of the most popular recipes on the blog was created especially with leftover turkey in mind, my Creamy Green Chile Turkey Enchiladas! My Turkey Wild Rice Soup is another hit. And don't forget to make Crockpot Turkey Stock with the carcass!
For a load of other ideas for using up leftovers, check out Using up Leftovers!
Have a wonderful Holiday Season!
—xoxo Michelle
Ultimate Classic Roast Turkey
Ultimate Classic Roast Turkey turns out perfectly juicy every time thanks to a wine-and-butter-soaked cheesecloth that keeps the turkey from drying out for most of the roasting time.
Ingredients
- 20 lb turkey, thawed, giblets and neck removed from cavity and reserved. Pop-up timer removed (if present)
- 3 sticks unsalted butter,, melted
- 4 tablespoon unsalted butter,, at room temperature
- One 750-ml bottle white wine (I like pinot grigio)
- 2 teaspoon salt
- 2 teaspoon freshly ground black pepper
- 1 recipe Easy Sausage Stuffing (link in Notes), or your favorite stuffing recipe (see note)
- Sprigs of rosemary, sage, and thyme
- 32 oz chicken stock, (use good quality store-bought stock or homemade)
Instructions
- Rinse the turkey carefully by pouring cool water over it, taking care not to splash; pat dry with paper towels. Cover in plastic wrap. Let stand for 2 hours at room temperature.
- You need only one rack in the oven: move it to the lowest possible level. Heat the oven to 450°. In a medium bowl, mix the melted butter into the white wine. Soak a piece of cheesecloth (enough to cover the bird) in the mixture.
- Put the turkey on the roasting rack of a heavy metal roasting pan with the breast facing up. (Trust me: don’t use the throw-away, flimsy, aluminum baking pans!) Fold the tips of the wing underneath the turkey. If necessary, break the wing joints so that they fold easily. Sprinkle a large pinch of salt and a large pinch of pepper inside the turkey cavity. LOOSELY fill the cavity with as much stuffing as it can comfortably accommodate without packing. Tie the turkey’s legs together with kitchen twine. Fold the neck flap underneath the bird. Give the turkey a massage with the room-temperature butter, loosening the skin where possible and pushing the butter underneath. Sprinkle liberally with salt and pepper.
- Remove the cheesecloth from the wine/butter mixture. Carefully squeeze so that the cloth remains wet. Spread the cloth as evenly as you can over the breast and sides of the turkey so that it covers part of the leg. Tuck the herb sprigs into and on top of the cheesecloth, so that they’re spread evenly over the top of the bird.
- If you can, put the turkey into the oven legs first (if not, simply rotate the pan every hour or so). Roast for 30 minutes. Use a turkey baster to dampen the cheesecloth and any exposed turkey with the wine/butter mixture. Add chicken stock to the roasting pan.
- Lower the temperature to 350°; cook another 2 ½ hours, basting every 30 minutes. Monitor the level of the pan juices, removing some if they rise too high. (Reserve the juices for gravy.)
- Remove the cheesecloth and discard. Baste the turkey with pan juices. If you don’t have enough juice, keep using the wine/butter mixture. Cook 1 more hour, basting after 30 minutes. Be careful not to mess up the skin.
- Check the temperature of the bird with an instant-read thermometer (insert in the thickest part of the thigh, being careful not to hit bone, and the breast). The temperature in the thigh should reach 180° F; the breast should reach 165º F. Also check the stuffing’s temperature: it needs to be ~165°. Continue roasting and basting as needed.
- By now, your turkey should be a beautiful, golden-brown color. When fully cooked, transfer the turkey to a carving board. Let it hang out for at least 30 minutes. (However, you ARE allowed to sneakily remove and snarf a bit of skin.) Carve and set on a serving platter, separating white from dark meat and framing with the drumsticks. Make it pretty with some herb sprigs. Reserve the carcass for making stock.
Notes
- If you don't want to stuff the bird with stuffing, you can put herbs, onions, and lemon slices into the cavity. Discard when you carve the bird.
- If you are roasting a smaller bird, the roast will not take as long. The general rule-of-thumb is to loosely plan 20 minutes per pound of turkey. However, this can vary significantly depending on your oven and whether you stuff the bird.
Nutrition Information:
Yield: 12 Serving Size: 3 ouncesAmount Per Serving: Calories: 150Total Fat: 20gSodium: 400mgCarbohydrates: 13gFiber: 1gSugar: 6gProtein: 221g
Nutrition data provided here is only an estimate: if you are tracking this information for medical purposes, please consult a trusted external source. Thanks!
Archana says
Wow, that is quite a job! I love the idea of baking under the cheesecloth never had to try anything like this. But the end result sounds delicious. Enjoy!
Michelle says
Thanks, Archana! It's totally worth it for the juicy white meat. No more drying out!
Jessica l Tao of Spice says
Mmmmm, the skin on that turkey looks perfect! This year will be my first year taking on the turkey. Thanks for all the tips! Hope mine turns out as good as yours.
Michelle says
Thanks, Jessica! I hope yours turns out perfect as well! 😉
Retha says
This looks absolutely delicious! I can’t wait for Thanksgiving so I can give this recipe a try. Thank you for the inspiration.
Michelle says
You're welcome, Retha! I hope it turns out well for you!
Biana says
I love classic recipes, and this one looks great! Looking forward to trying it.
Michelle says
Thank you, Biana!
Danielle says
Help! My first time to make turkey and I have no clue of which white wine to use? Can you offer your opinion on an inexpensive wine to use? Thanks again!
Michelle says
Hi, Danielle! I often use Pinot Grigio. There are perfectly decent bottles for $10 or less. I hope that helps! Good luck with your turkey!
Jacqui Bellefontaine says
I too can recommend the cheesecloth method I have used it numerous times over the years. I think I heard about it here in the Uk many years ago from Delia Smith or Mary Berry I can't remember which. Interestingly I dont take mine off until the end of cooking and find it colours perfectly. I tried brinning for the first time last year and used a gin brine it was good but a waste of gin in my opinion. So wouldn't bother again.
If don't use the cheesecloth method then I opt for cooking at a fairly low temperature and lots and lots of basting.
Michelle says
Wow, Jacqui, how interesting! When I take the cheesecloth off, the turkey looks like it just crawled out from under a rock (at least on the breast and abdomen)—but maybe that's just because I didn't leave it on long enough! YIKES: gin in a brine! I can think of a much better use of gin, and it involves tonic and a lime. 😛
Agness of Run Agness Run says
This seems like an ultimate Turkey recipe, Michelle. Is it possible to prepare it without wine? I'd rather use plain water instead.
Michelle says
Hi, Agness! Sure, you can do that. You could also melt the butter in vegetable or chicken broth to use for basting (just keep it at a low simmer). I switch over to basting with the pan juices as soon as I have enough. 😉
Kirsty Hijacked By Twins says
I LOVE turkey I could happily have it all year round. Thank you for sharing with #cookblogshare x
Michelle says
Thanks, Kirsty! I'm coming around—it's such a great bargain! 🙂
Corina Blum says
There are so many posts at the moment about how to roast a turkey so it's really refreshing to read one that's a little bit different. I've never heard of this cheesecloth method before but it sounds like it works really well. I'll be roasting a turkey for Christmas and although I haven't decided on how I'm going to do it yet, I am looking forward to it! Thanks for sharing with #CookOnceEatTwice
Michelle says
Thanks so much, Corina! However you do it, I hope your turkey turns out awesome!